14.1 Configuring an external system for REST notifications
To enable a REST notification, you must create a connection to your REST web service using the External Systems workflow.
To create an external system:
-
From the Configuration category, select External Systems.
You can also launch this workflow from the Connections and Notifications section of the More category in the MyID Operator Client. See the Using Connections and Notifications workflows section in the MyID Operator Client guide for details.
-
Click New.
-
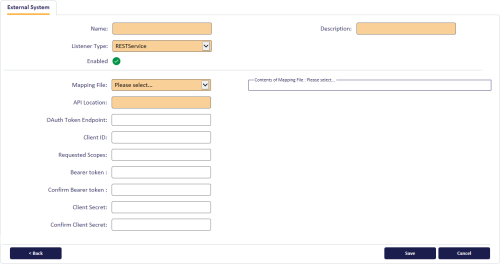
From the Listener Type drop-down list, select RESTService.
The details for a REST notification external system appear.
-
Complete the following details:
-
Name – Type the name of the notification you want to configure.
Important: This must match the notification generated by MyID for the device lifecycle event. By default, you can provide one of the following values:
-
REST Device Issued
-
REST Device Cancelled
-
EnableCard
-
DisableCard
These values are case sensitive. See section 14.2, Standard REST notifications for details of these notifications.
-
-
Description – Type a description for the external system.
-
Enabled – Select this option to enable the notification, or deselect it to disable the notification. When the notification is disabled, MyID does not attempt to send this notification to the external system.
-
Mapping File – Select the mapping file you want to use from the drop-down list.
Mapping files are stored on the MyID application server in the following folder by default:
C:\Program Files\Intercede\MyID\Components\ExternalSystemMappings\
For details of the provided standard mapping files, see section 14.2, Standard REST notifications.
For details of creating your own mapping file, see section 14.3, Creating a mapping file.
Once you have selected the mapping file, its contents appear on screen.
-
API Location – Type the base URL of your REST web service API.
The endpoint for the notification is generated by taking this API location and appending the endpoint URL specified by the mapping file; for example, if your API Location is:
https://myserver.example.com/Notify
and the mapping file specifies:
<Endpoint Verb="POST" URL="/devices/deviceIssued" />
MyID sends a POST notification to:
https://myserver.example.com/Notify/devices/deviceIssued
-
-
Provide the authentication details for your web service.
You can either provide a pre-requested bearer token, or use an OAuth2 provider to request a bearer token.
To use a pre-requested bearer token, provide the following information:
-
Bearer token – Type the bearer token you want to use.
-
Confirm Bearer token – Type the bearer token again to confirm it.
Note: MyID does not validate the bearer token before using it to send the notification. You must ensure that the token is valid.
Alternatively, to use an OAuth2 provider to request a bearer token, provide the following information:
-
OAuth Token Endpoint – Type the URL of the web service token provider.
-
Client ID – Type the client ID that has been registered with the OAuth2 token provider.
-
Requested Scopes – Optionally, provide the scopes you want for the requested token. If you do not provide any scopes, the default scope configured for the token provider is used.
-
Client Secret – Type the shared secret you have configured for the token provider.
-
Confirm Client Secret – Type the shared secret again to confirm it.
Note: The token is issued with the default validity period for the bearer token scope; you cannot specify a validity period. MyID caches the provided token and requests a new one once the token's validity period has expired.
-
-
Click Save.

14.1.1 Enabling and disabling a notification
To enable or disable a notification:
-
From the Configuration category, select External Systems.
-
From the Name drop-down list, select the external system you created for the notification you want to enable or disable.
-
Click Edit.
-
Set the Enabled option.
When the notification is disabled, MyID does not attempt to send this notification to the external system.
-
Click Save.